Today i borrowed a Wii Remote with Plus inside, one of the newer ones (RVL-CNT-01-TR) with the Sync Button on the battery cover. My hearings were true, they have a different hardware ID, but that was just a minor problem and fixed with one line in the INF-file. The bigger problem was, that they differ a little bit in behavior. So in the end you can’t connect the new Wii Remotes by pressing the 1 and 2 buttons, instead you have to use the Sync button each time. There were some additional trouble, but i fixed that as well.
Another new feature are a second X and Y axes for tilt. Currently tilt is only tracked by the accelerometer, so it’s a little bit inaccurate and you have to hold the Wii Remote still. The Motion Plus gyroskop is not supported yet, but that will be my next task. You might need to recalibrate the asxes via the gamecontroller properties dialog. The reason is, that all Wii Remotes are not well calibrated, so the middle, minima and maxiuma are a little bit shifted.
Hower, newest version can be downloaded here: HID Wiimote
Changes
Added support of the newer Wii Remotes (RVL-CNT-01-TR)
Added second X/Y axes representing tilt (Currently only tracked by the accelerometer)
In the past days i’ve worked a lot on the driver. Unfortunatly there were some problems with the last uploads. Now i’ve tested everything and it should work properly. If you still encounter any error, please let me know.
The d-pad is represented as X/Y axes now, instead of four different buttons.
The four LEDs will now represent the remaining battery charge.
On Windows 8 the Wii Remote will now be marked as Offline, when powering it off or Windows is rebooted.
Installation
Added an Installer. DPInst.exe is a Microsoft provided default installer for driver packages. The installer will also add an entry to your Programs and Features for uninstalling the driver.
I am recently working on an Extension Mod for Starcraft 2. Doing so is quite difficult because there are very few tutorials and no official documentary. Especially if you never used the Warcraft 3 Editor before, the Editor is very overwhelming. But still if you used it, the Galaxy Editor has many new features. So i want to share some of my knowledge.
The topic is ‘User Data’, a way to store your map or extension custom data. This article is based on the Starcraft 2 and Galaxy Editor version Heart of the Swarm 2.1.1.
Introduction
When you start making maps or extensions, you create all of your specific Units and Behaviors. But in some cases some data is left you don’t know where to put it, e.g. data for your quests, or which wave will contain how many of what unit. Then you are most likely tempted to put that information into triggers and their variables. You can do so, but that can end in a mess.
A better way is to use the ‘User Data’. You can create ‘User Types’ in the Data Editor and fill those with your ‘User Data’. ‘User Types’ are like Records in the Trigger Editor but you fill them right away like creating a new Unit.
The benefit of using ‘User Data’ is the separation of your trigger logic and your data. In programming terms, using the Trigger variables and defining them via Triggers is like hard coding your data. (In fact Starcraft 2 does translate your triggers to galaxy script and compiles it, so your data is indeed hard coded)
Structure
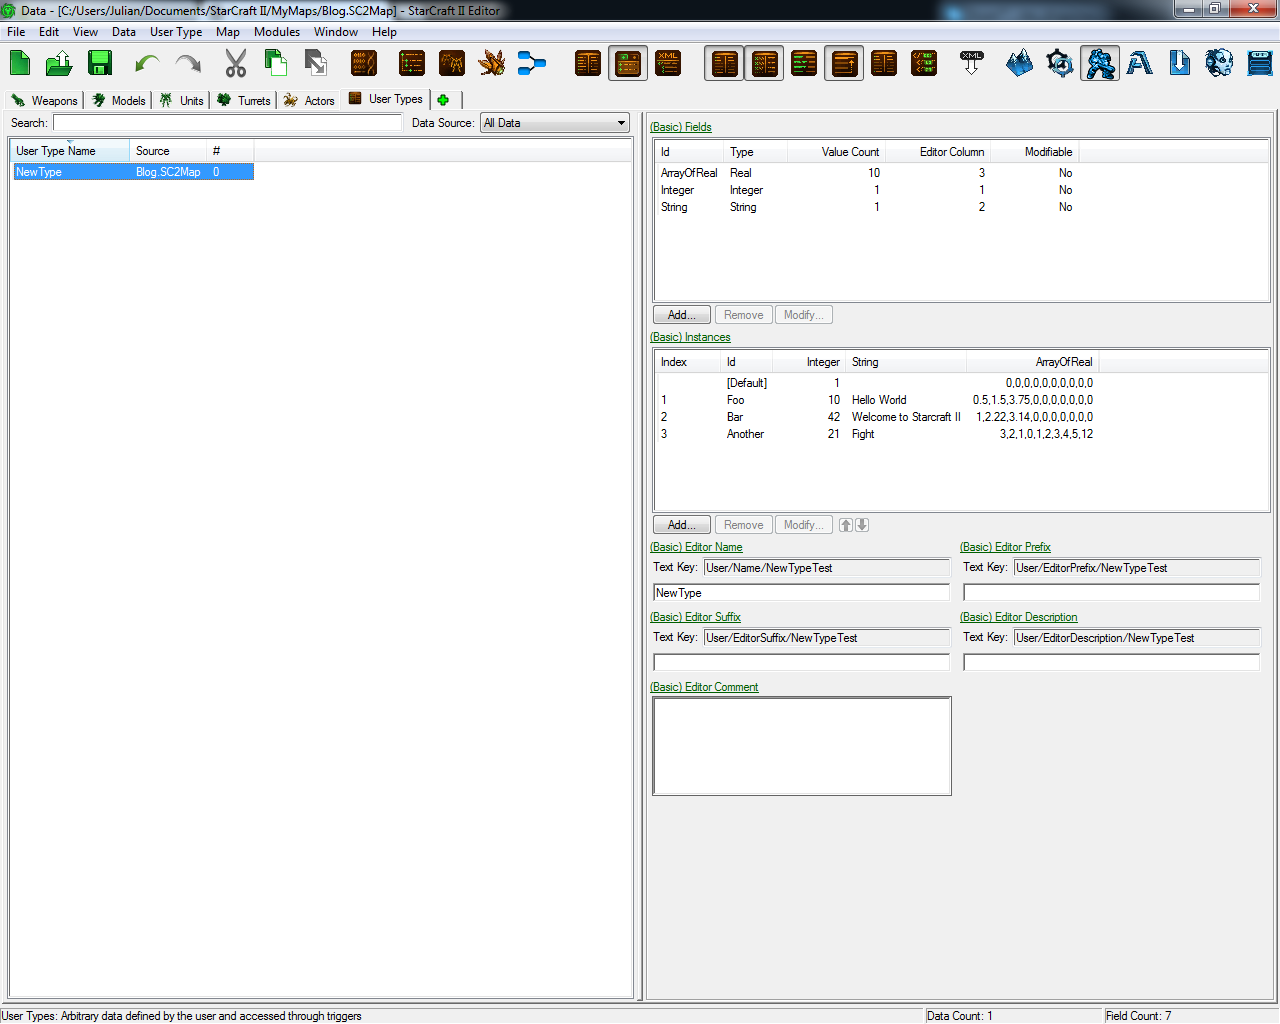
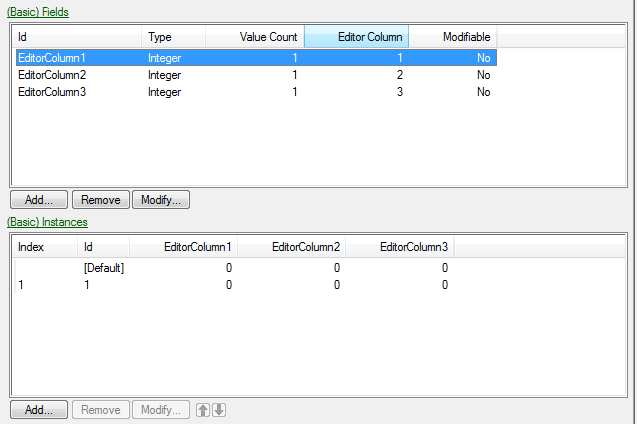
An ‘User Type’ is a Data Entity like an Unit. At first you have to create a new ‘User Type’ in the Data Editor. Then you define its Fields with its types. After that you define Instances which are like rows in a database. Each Instance can have an unique index and an Id to identify it. The index is an Integer whereas the Id is a string.
Example of a ‘User Type’ with Fields and Instances
In Triggers you can then access and get the Value of a Field for an Instance via Setter Actions and Getter Functions. Furthermore you can save References of Instances in variables as well.
Data Editor
Create ‘User Types’
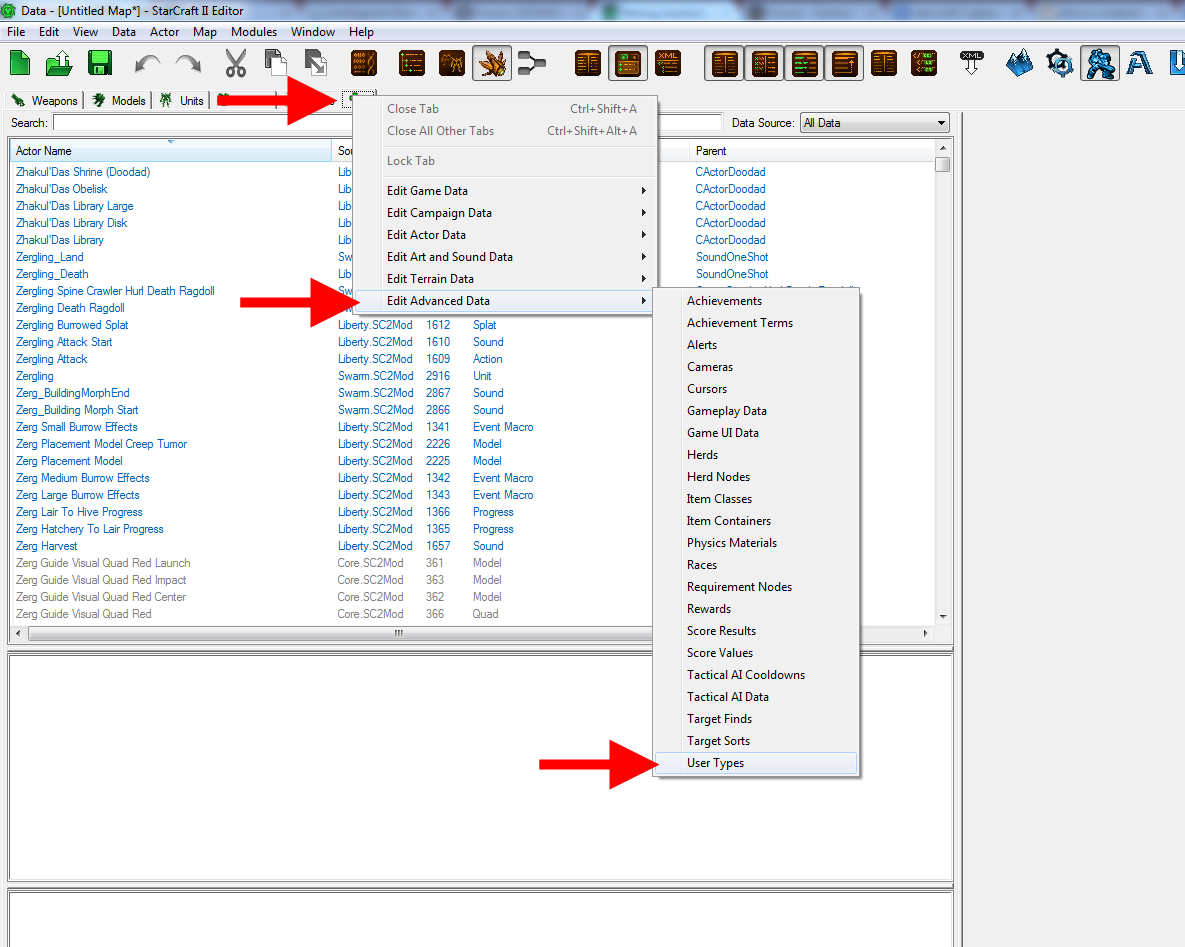
All you need is the Data Editor. Open the ‘User Types’ tab by clicking on the green plus, move you mouse over ‘Edit Advanced Data’ and choose ‘User Types’
Open the ‘User Types’ Tab via ‘Green Plus’ -> ‘Edit Advanced Data’ -> ‘User Types’
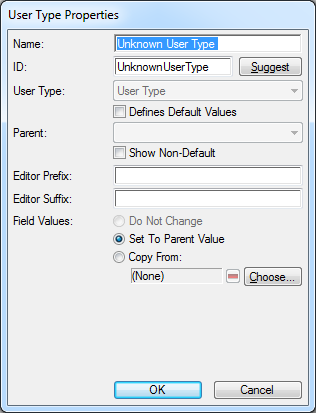
Then right click in the top white box an choose ‘Add User Type…’ so an ‘User Type Properties’ dialog will show up.
Right click in the ‘User Type’ list and choose ‘Add User Type’
Define a ‘Name’ for your ‘User Type’. This name will be used in dialogs in the Galaxy Editor, wherever you have to select a ‘User Type’. The ‘ID’ will be used inside the engine to refer to this ‘User Type’ and has to be unique. Just use the suggested name by clicking the ‘Suggest’ button after you filled in the name.
The ‘Define Default Values’ checkbox makes the ‘User Type’ a parent only. This means, it defines a type with its fields, but does not have any instance (it can have instances but those do not have any values for their fields). A new ‘User Type’ can then be cloned from a parent.
With ‘Parent’ you select an ‘User Type’ which will function as a parent for creation. On creation the parent will be cloned with its fields (but without it’s values). This means the new ‘User Type’ will have the same fields like its parent. However if you change the parent afterwards, the children’s fields won’t change. The ‘Show Non-Default’ checkbox will list all ‘User Types’ in the drop-down list, else only ‘User Type’ with ‘Define Default Values’ checked will be listed.
The ‘Editor Prefix’ and ‘Editor Suffix’ will just add text to the name displayed in the Editor.
‘Field Values’ defines from which the field values will be copied on creation.
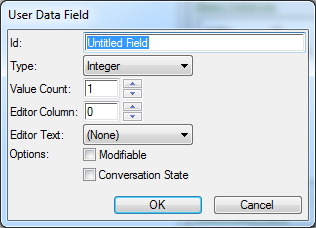
After creating the ‘User Type’ you have to add fields. Fields define what kind of data the ‘User Type’ consists of. Select the new type on the left, so you see its properties on the right. If you use the Table View, first right click on Fields and choose ‘Modify Value’. Then in either views click on ‘Add…’ below the ‘Fields’ list.
Click on ‘Add…’ beneath the Fields list
Choose an ‘Id’ for the new Field. It is also the name displayed within the Editor.
Next choose the ‘Type’ of data the Field will contain.
‘Value Count’ defines how many values are stored in this field. If it is greater than one the field is like an array.
If you set ‘Editor Column’ greater than one the field and its value are displayed in the Instances List.
Three Fields with ‘Editor Column’ greater than one
I don’t know what ‘Editor Text’ does. But it changes nothing, so it seems not to be important.
With ‘Modifiable’ checked, you can change the value of this Field with Triggers while the map is running. If not the Field is considered as read only.
‘Conversation State’ makes this field available to be used within conversation conditions and states.
Fill it with data
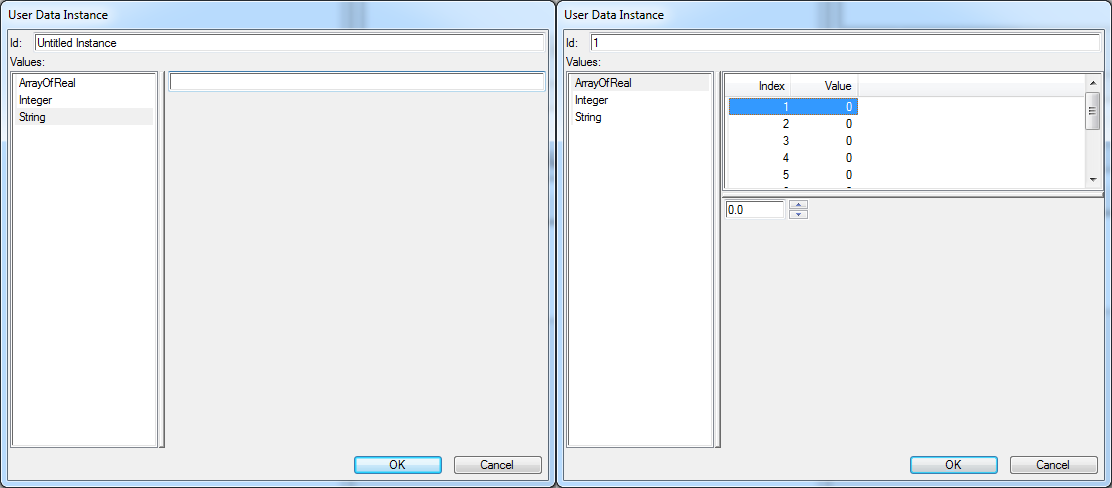
To fill an ‘User Type’ with data you define Instances. Click on ‘Add…’ under the Instances list. In the Table View first you have to right click on Instances and choose ‘Modify Value’.
First choose an ‘Id’ which will be also the name of this Instance. The ‘id’ will be displayed within the Editor and has to be unique within the ‘User Type’.
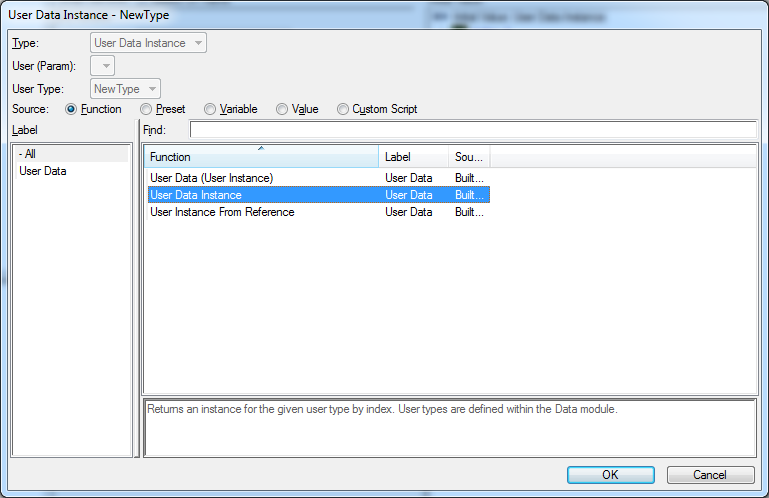
The ‘User Data Instance’ Dialog; the right side will change depending on the selected Field
On the left you can then select a Field you want to set its value. The right side of the dialog will change then depending on the type of the Field. Fill in the value of the Field and after you filled in all the data for this Instance click on ‘OK’.
If the selected Field has a ‘Value Count’ greater than one a list with indices and values will be displayed.
Example of Fields and Data for an ‘User Type’
You might wonder what the first Instance [Default] might be. It defines the default values for each field when adding a new Instance. E.g. if you want to add more Instances and the Field Integer has the value 10 in many cases. Then you could change the value of the Integer Field for the default instance. So when creating a new instance the value of Integer will be preset to 10.
Triggers
After creating a ‘User Type’ and filling it with some data the next step is to access the data within your Triggers. The Editor provides several Actions to modify ‘User Data’ and Functions to retrieve the data. Additional there are also two different Variable types to work with ‘User Data’
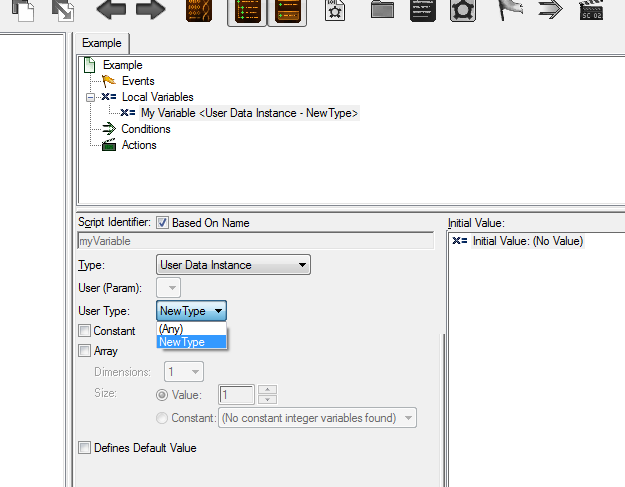
Variables
Those Variable types are ‘User Data Instance’ and ‘User Data Field’. First one is used to refer to an ‘User Data’ Instance and the second one is used to refer to an ‘User Data’ Field type.
Variable declaration settings
Both of those variables have a ‘User Type’ drop-down menu in their declaration settings. It is used to specify which ‘User Type’ will be saved in the variable and is part of its type declaration.
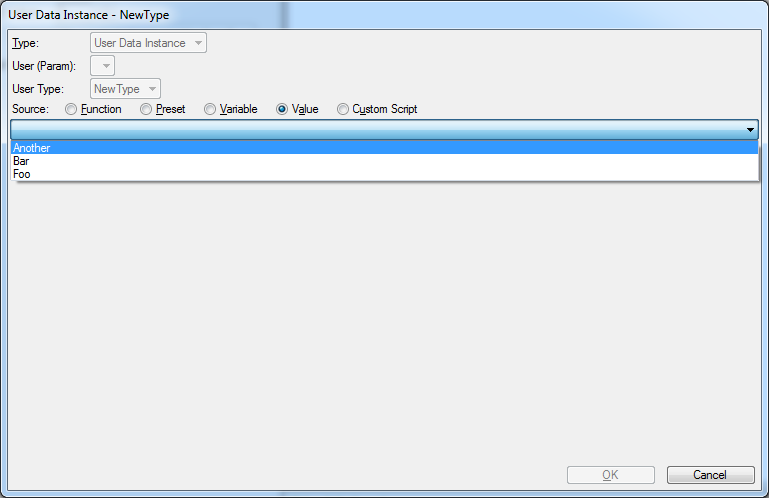
To fill such variable with an instance two ways are given. First one is to pick one Instance from an drop-down list and the other is to use a predefined (or user-defined) function.
Choosing a ‘User Data Instance’ from the dropdown list
Functions
The common function to get an ‘User Type’ Instance is the ‘User Data Instance’ function. It takes two arguments and returns an ‘User Data’ Instance.
The ‘User Data Instance’ Function
User Data Instance – User data instance 1 for User Type
User Type: Specifies the ‘User Type’ from which the Instance is loaded.
1: The index of the Instance to be loaded.
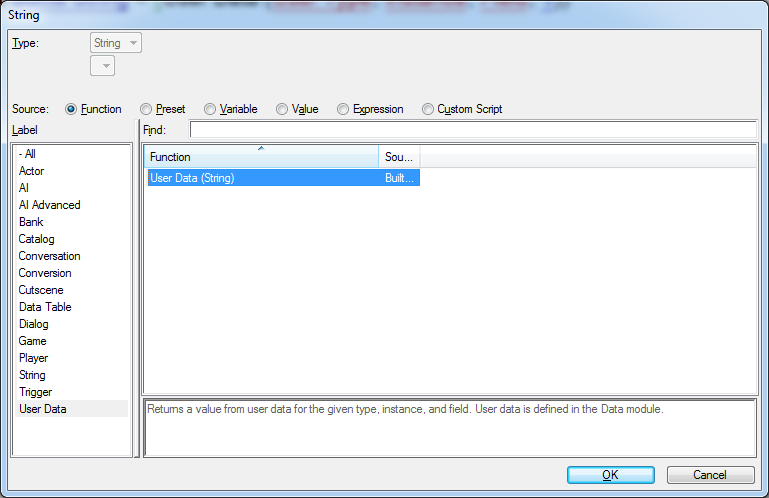
To retrieve data from an Instance the Editor provides several Functions. They’re all the same in the manner of arguments and how they work. The only difference is their return type. So for each data type exists one function to request it. Their names are ‘User Data (Type)’, where Type stands for the respective return type.
The ‘User Data (Type)’ Function for Strings
‘User Data (Type)’ – User data (User Type, Instance, Field, 1)
User Type: Specifies what ‘User Type’ will be accessed and what type the Instance is.
Instance: The Instance you want to retrieve the value from.
Field: From which Field you want to get the value.
1: The index of the value within the Field. This parameter refers to the ‘Value Count’ you specify when creating a new field. If ‘Value Count’ is one leave it unchanged, it is the index of the value within the list of values.
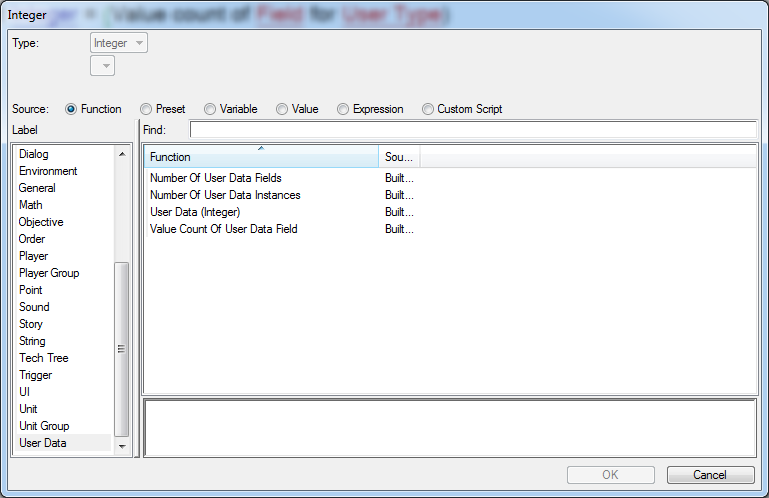
Besides you can get some some more information about the ‘User Type’. The Editor provides three functions to get some numbers.
Additional Functions for ‘User Data’
Those three are ‘Number Of User Data Fields’, ‘Number Of User Data Instances’ and ‘Value Count Of User Data Field’. Their return type is Integer. You can use them to iterate over the respective Fields, Instances or Values.
The first one:
‘Number Of User Data Fields’ – Number of user data field for User Type
User Type: The ‘User Type’ you want to get the number of fields from.
The second one:
‘Number Of User Data Instances’ – Number of user data instances for User Type
User Type: The ‘User Type’ you want to get the number of Instances from.
The last function:
‘Value Count Of User Data Field‘ – Value count of Field for User Type
Field: The Field of the ‘User Type’ the count of values will be returned.
User Type: The ‘User Type’ of the Field you want to get the value count.
When using ‘Value Count Of User Data Field‘ it will return the value specified as ‘Value Count’ when you created the Field. So even when the value array is not completely filled it will return the maximal count of values.
Actions
There are some Actions to modify Field values, reset them and save and load ‘User Data’ from and to banks. I haven’t used them yet. But my guess is, you can modify Field values, that are flagged with ‘Modifiable’. You can reset them to their default values with the Reset Actions. Then its possible to save modified ‘User Data’ to bank files to persist the change for the next map start. Next time the map is started you can load the ‘User Data’ from the bank file to restore the previous state.
This might be a nice way to store your current map state. Then it’s very easy to save the progress and recover it on the next map start to continue.
XML
Import/Export
Instead of importing your data via the graphical Editor you can import and even export your data as XML. The key is that the Editor stores all map data as XML (maybe not the terrain but i’m not totally sure). You can switch the Data Editor to XML View by clicking the ‘XML View’ button.
The Data Editor in XML View
The Editor data is then displayed as XML on the right side.
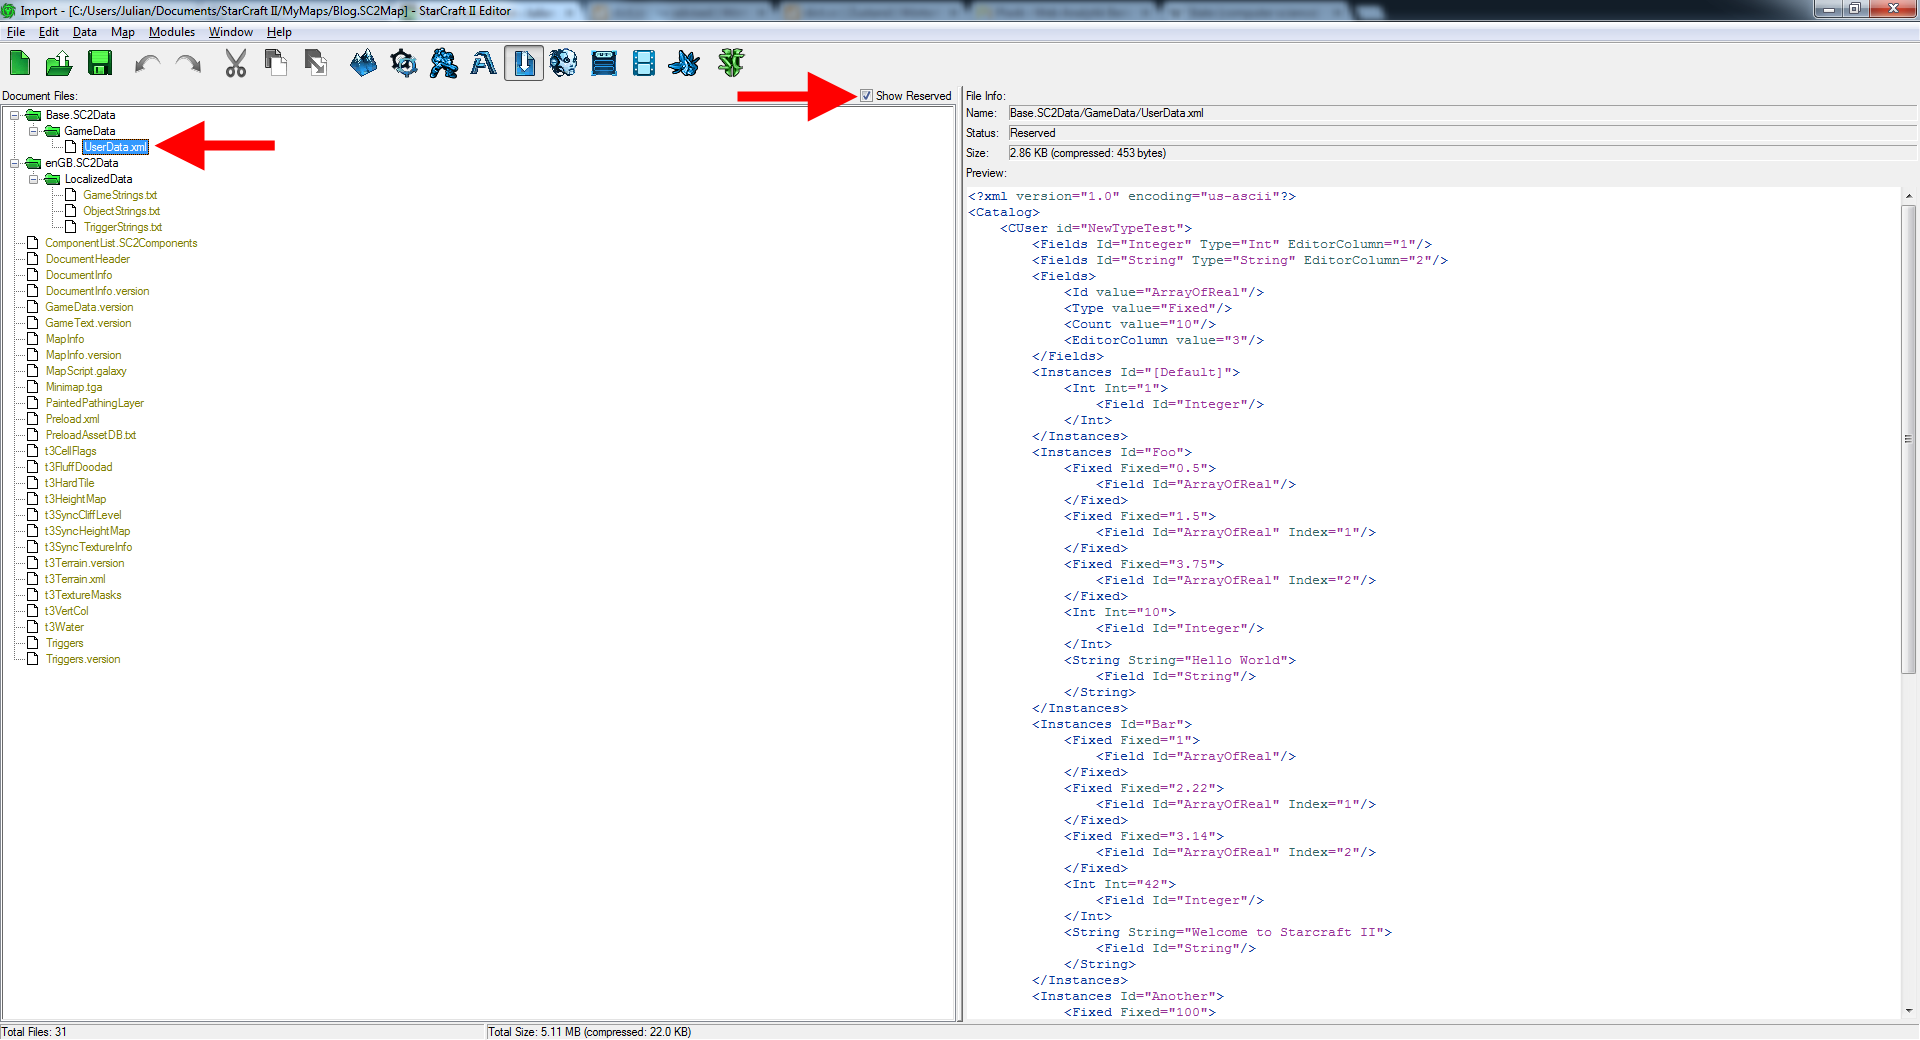
Another way to import and export whole XML files is the Import Editor. Check the ‘Show Reserved’ box and you will see the ‘UserData.xml’ file. To export the file simply click on ‘Data’ and then ‘Export Files …’. Choose a Directory where the file will be put and click ‘OK’.
The Import Editor with reserved files displayed
Importing the ‘UserData.xml’ file is a little bit more difficult and requires some steps.
Rename your XML file to a non-reserved name, else the editor won’t let you import it. E.g. ‘UserData_.xml’
Import the file via ‘Data’ >> ‘Import Files …’. Browse to your XML file, be sure the file is checked and click ‘OK’.
Then rename the newly imported file in the Import Editor by right clicking it and choosing ‘Rename’.
Save the Map/Extension
Restart the Editor, else the new User Data won’t be available in the Data Editor.
Nevertheless how you import XML, the big advantage is you can easily and fast import much data by simply copy paste the XML instead of clicking through the UI dialogs. Imaging you have all your quest data in an Excel table. Importing one hundred of quests would require a lot of time by doing it via the Editor. A much faster way would be a simple script which converts your table into appropriate XML. Then just one copy and paste command and all of your quests are in your Map/Extension.
Structure
Instead of creating the ‘User Type’ via XML, i recommend to create its Fields and some sample data with the Editor. Then use the sample data as template and only fill it with further data. Especially when you use non-primitive types (i.e. Unit, Game Link, Model, etc.) create enough sample data so you know how they are encoded. The problem is that the Editor only uses strings, so references to other entities are saved as their IDs.
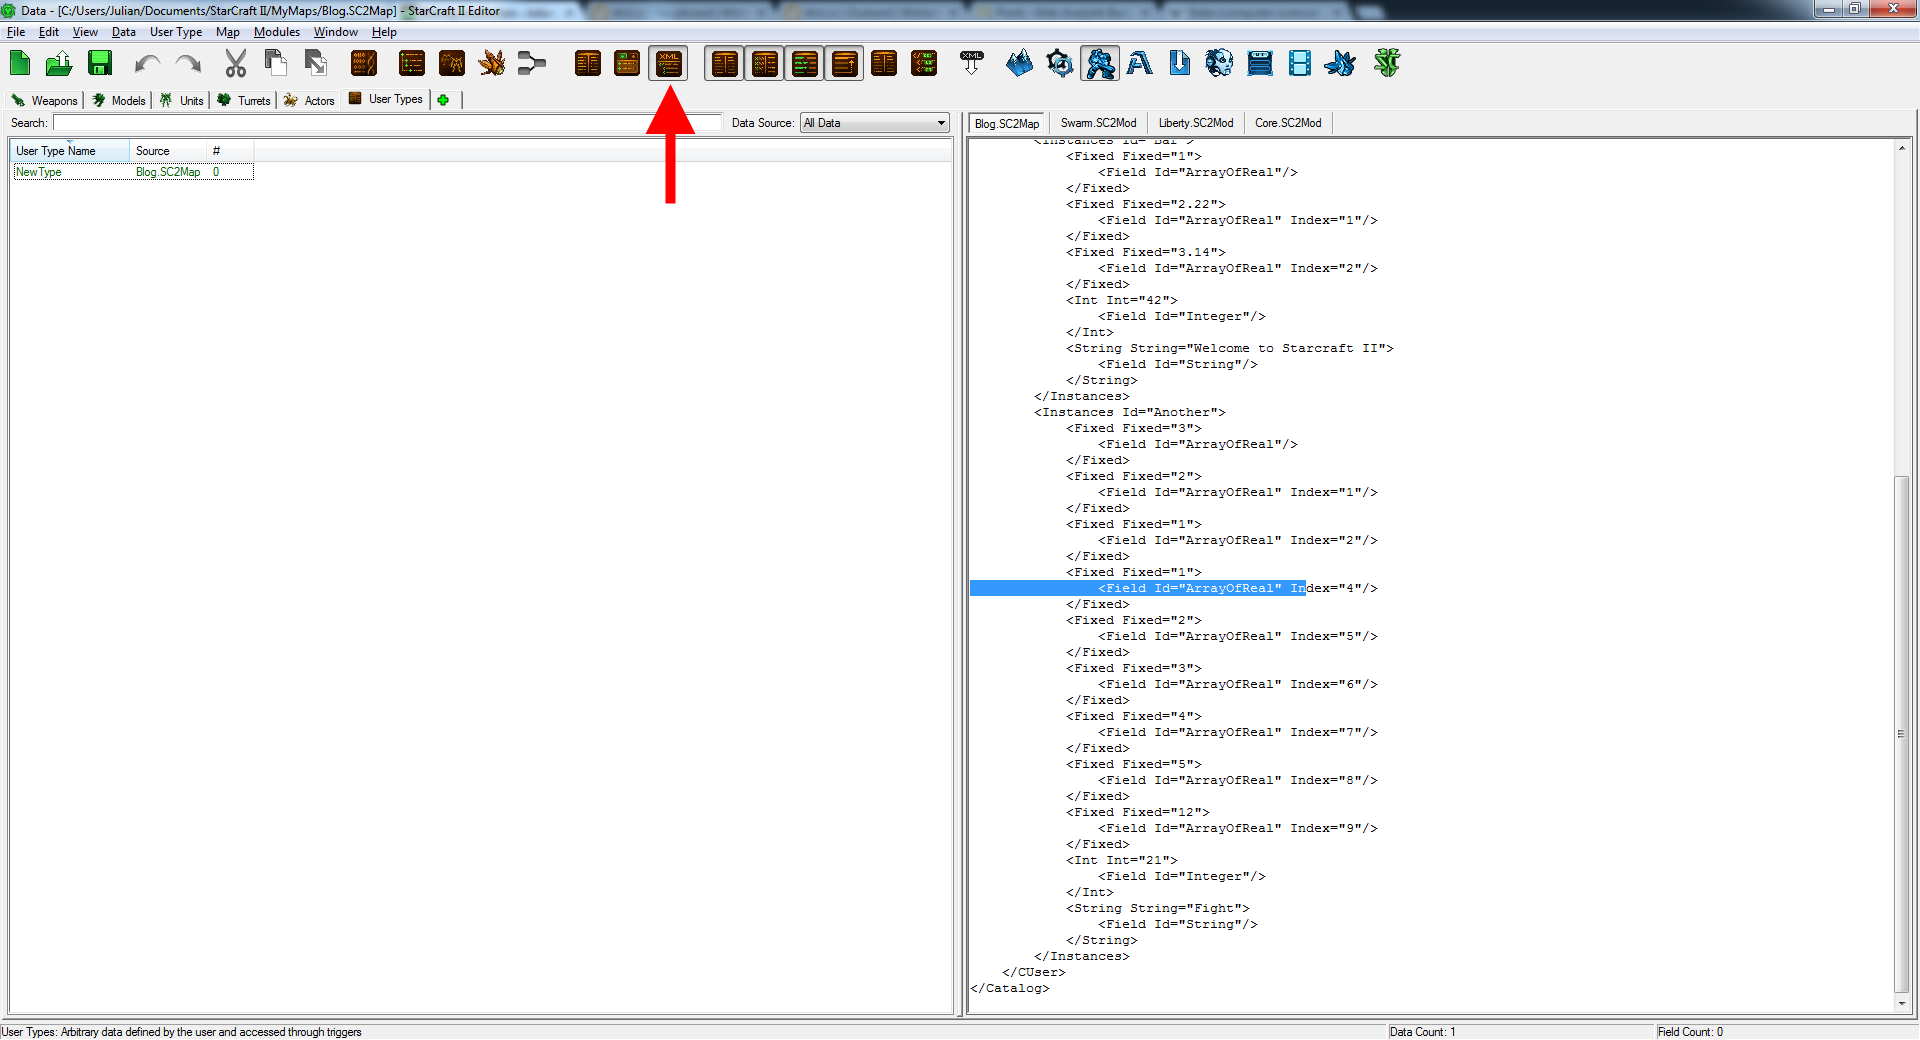
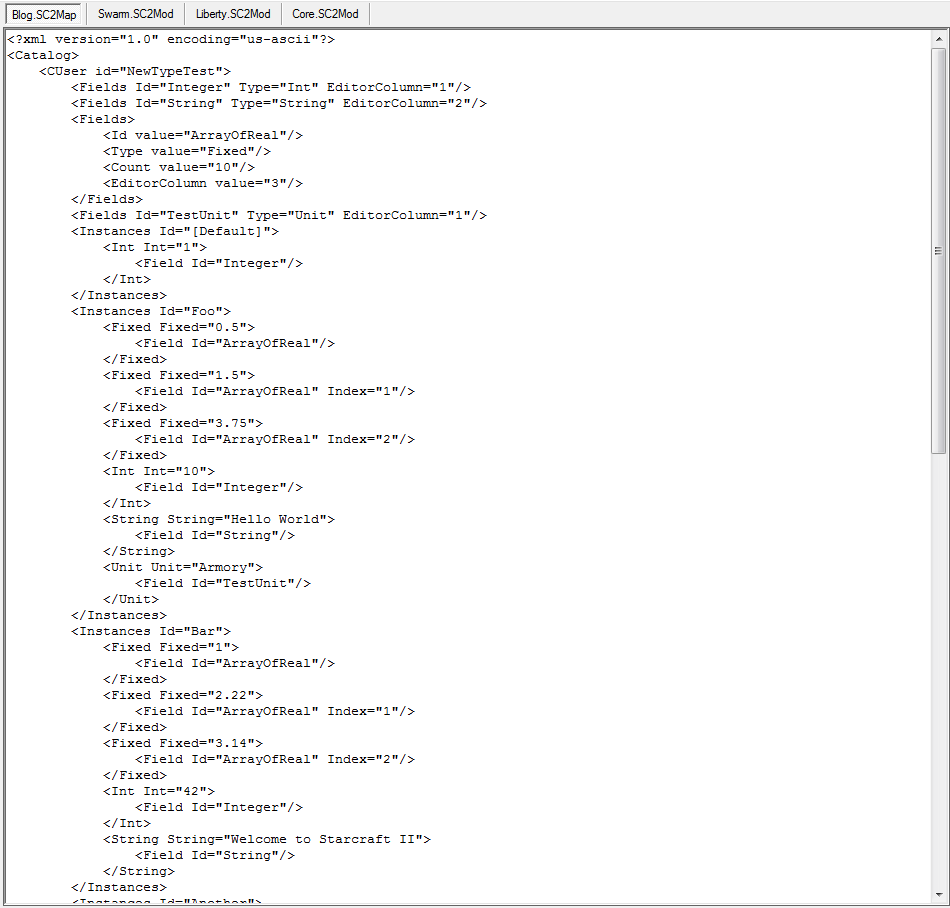
The XML of our example data
The root node of the XML file is ‘<Catalog></Catalog>’. Every ‘User Type’ is a ‘<CUser></CUser>’ child node. Its name is the attribute ‘id’.
The Fields and Instance are direct childs of the ‘<CUser>’ node. The Fields are each declared as ‘<Fields />’ nodes. For their ID the attribute ‘Id’ (caution: Capital I) is used. The type is encoded as string in the ‘Type’ attribute. The ‘Editor Column’, ‘Value Count’ and Flags are only declared if they differ from their default values.
After the Field nodes the first Instance node is the ‘[Default]’ Instance. If you haven’t changed any of its values the tag will be an empty one. Instances are declared through the ‘<Instance></Instance>’ tag. Their only attribute is ‘Id’ which is their string identifier. The index is their order inside the XML file. So the second ‘<Instance></Instance>’ node will have the index one, the second one index two and so on.
Their values are stored in a rather counter-intuitive way. Each value is declared as a type node, i.e. ‘<Fixed></Fixed>’ for Reals, ‘<Int></Int>’ for Integers and so on. Their value is stored as an attribute named after their type. The reference to which Field this value belongs to is then declared as a ‘<Field />’ child node. The ‘<Field />’ node’s ‘Id’ attribute refers to the Field identifier. If a Field has more than one value (‘Value Count’ higher than one) the ‘<Field />’ node has an additional ‘Index’ attribute, except for the first value node. The ‘Index’ value starts at one.
As you can see in the Image above about the example data in XML, the first value entity for the Field ‘ArrayOfReal’ of each Instance does not have an ‘Index’ attribute, but the second and third one does.
Conclusion
‘User Data’ is a nice way to store you Map/Extension Data, especially if the data comes from an external source. I hope this article gives you an understanding on how to use it. If you have any questions regarding ‘User Data’, feedback to this article or any other concern, please let me know and feel free to leave a comment.
My homepage is finally online. The idea of having an online portfolio is quite old, but i never got time to set one up. Especially because i wanted to code it by my own. But now here it is, obviously not coded by myself.
So at the start, i want to share this video “Getting Noticed”. It’s about how important it is to have an own online portfolio and how easy it is to make one.
Websites store cookies to enhance functionality and personalise your experience. You can manage your preferences, but blocking some cookies may impact site performance and services.
Essential cookies enable basic functions and are necessary for the proper function of the website.
Name
Description
Duration
Cookie Preferences
This cookie is used to store the user's cookie consent preferences.